When you are creating a stack in AWS CloudFormation, AWS CloudFormation makes an underlying service call to AWS to configure your resources. CloudFormation can only perform actions that you have permission to do. Example, to create EC2 instances by using CloudFormation, you need permissions to create instances. You’ll need similar permissions to terminate instances when you delete stacks with instances. You can use AWS Identity and Access Management (IAM) to manage all your permissions.
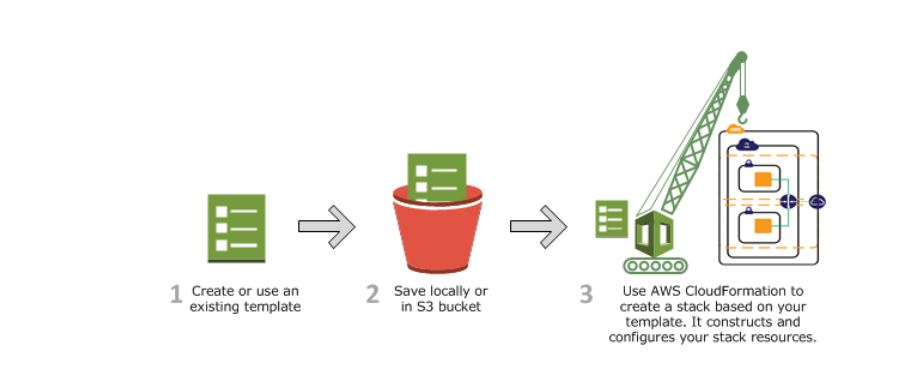
The calls that CloudFormation makes are all declared by your template. So, suppose you have a template that describes an EC2 instance with a t2.micro instance type. You will use this template to create a stack, CloudFormation calls the Amazon EC2 create instance API and specifies the instance type as t2.micro. The diagram below explains CloudFormation workflow for creating stacks.

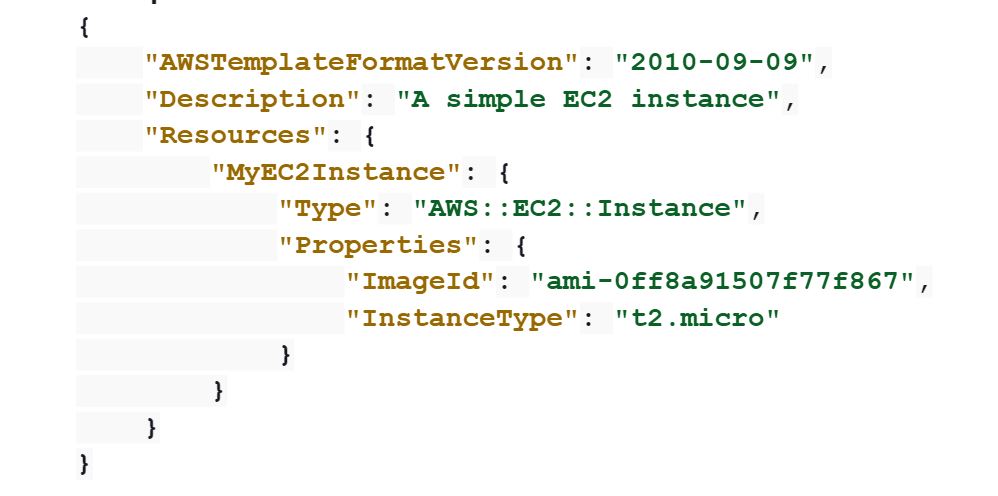
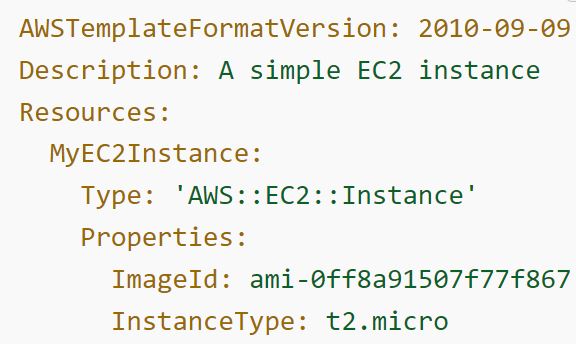
- Use the AWS CloudFormation Designer or your own text editor to create and modify a CloudFormation template in JSON or YAML format. You can also choose to use a provided template. The CloudFormation template describes the resources you need and their settings. Example, suppose you want to create an EC2 instance, your template can declare an Amazon EC2 instance and describe its properties.
JSON example

YAML example

2. Save the template locally or in an Amazon S3 bucket. If you created a template, save it with a file extension like: .json, .yaml, or .txt.
3. Create a CloudFormation stack by specifying the location of your template file, such as a path on your local computer or an Amazon S3 URL. If the template contains parameters, you can specify input values when you create the stack. Parameters allow you to pass in values to your template so that you can customize your resources each time you create a stack. You can create stacks by using the CloudFormation console, API, or AWS CLI.
NB: If you specify a template file stored locally, CloudFormation uploads it to an S3 bucket in your AWS account. CloudFormation creates a bucket for each region in which you upload a template file. The buckets are accessible to anyone with Amazon Simple Storage Service (Amazon S3) permissions in your AWS account. If a bucket created by CloudFormation is already present, the template is added to that bucket. You can use your own bucket and manage its permissions by manually uploading templates to Amazon S3. Then whenever you create or update a stack, specify the Amazon S3 URL of a template file.
CloudFormation provisions and configures resources by making calls to the AWS services that are described in your template. After all the resources have been created, CloudFormation reports that your stack has been created. You can then start using the resources in your stack. If stack creation fails, CloudFormation rolls back your changes by deleting the resources that it created.
Updating a stack with change sets
When you need to update your stack’s resources, you can modify the stack’s template. You don’t need to create a new stack and delete the old one. To update a stack, create a change set by submitting a modified version of the original stack template, different input parameter values, or both. CloudFormation compares the modified template with the original template and generates a change set. The change set lists the proposed changes. After reviewing the changes, you can start the change set to update your stack or you can create a new change set. The following diagram shows the workflow for updating a stack.

- You can modify a CloudFormation stack template by using AWS CloudFormation Designer or a text editor. Example, if you want to change the instance Type for an EC2 instance, you would change the value of the Instance Type property in the original stack’s template.
- Save the CloudFormation template locally or in an S3 bucket.
- Create a change set by specifying the stack that you want to update and the location of the modified template, such as a path on your local computer or an Amazon S3 URL. If the template contains parameters, you can specify values when you create the change set.
NB: If you specify a template that’s stored on your local computer, CloudFormation automatically uploads your template to an S3 bucket in your AWS account.
4. View the change set to check that CloudFormation will perform the changes that you expect. For example, check whether CloudFormation will replace any critical stack resources. You can create as many change sets as you need until you have included the changes that you want.
5. Initiate the change set that you want to apply to your stack. CloudFormation updates your stack by updating only the resources that you modified and signals that your stack has been successfully updated. If the stack updates fails, CloudFormation rolls back changes to restore the stack to the last known working state.
Deleting a stack
When you delete a stack, you specify the stack to delete, and CloudFormation deletes the stack and all the resources in that stack. You can delete stacks by using the CloudFormation console, API, or AWS CLI.
If you want to delete a stack but want to retain some resources in that stack, you can use a deletion policy to retain those resources.
After all the resources have been deleted, CloudFormation signals that your stack has been successfully deleted. If CloudFormation can’t delete a resource, the stack won’t be deleted. Any resources that haven’t been deleted will remain until you can successfully delete the stack.
Reference: https://docs.aws.amazon.com/AWSCloudFormation

